Hey everyone, today I am sharing an easy nail art tutorial for the Chevron look I posted yesterday.
Things you will need
1. Base coat and Top coat (I used Orly Bonder and INM Out the Door)
2. Three different shades of nail paints: plum/berry, pink and silver (I used Colorbar Plumtastic, Essie Madison ave-hue and Sally Hansen Celeb City).
3. Striping tape, scissors, cleaning brush, tweezers and Acetone.
Steps
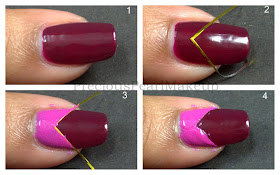
1. Apply base coat and then apply the berry/plum polish. Let it dry completely.
2. Make a V shape (near the cuticles), using a nail art striping tape.
3. Fill the area near cuticles with pink polish without going over the striping tape.
4. Remove the striping tape and let the polish dry completely.
After the polish dries you can top coat it and you'll have this look (in case you just want the Chevron nails).
5. Make a triangle pointing towards the free edge of the nail, using a striping tape.
6. Fill the triangle using the silver polish carefully.
7. Carefully remove the tape and you have your triangle.
8. Top coat the nail and add a rhinestone.
You have your completed look...Enjoy!!
Thanks for stopping by. Stay beautiful...

+copy.jpg)


No comments:
Post a Comment
Please be respectful and refrain from using profanity or including links in your comments. Posts containing either will be deleted. If you have a blog you would like me to check out, shoot me a message and your link by using my Contact Me form.